
What is USB Write Caching?
In this guide, we'll start by defining write caching and exploring its potential pros and cons. We'll then show you how to enable or disable, depending on your preference, write caching on Windows 10, Mac, and Linux operating systems.
Skip to enable or disable write caching in:
Defining "Write"
In the context of computers, writing is the process of retrieving information from a source and then transferring that info to a destination. Commonly referred to as a write command, you can think of this as the paste function from when you copy and paste some text. All storage media and files are basically writable but writing can be restricted depending on the access granted by the administrator.
Defining "Caching"
Caching, on the other hand, is storing data in a cache or a temporary storage space. Perhaps the most popular use of caching is in web browsers where the data you request from a web page is stored in a cache folder on your hard drive. The next time you return to the same web page, the browser will access the cache folder, instead of sending another request and waiting for the server to retrieve the data. This makes your browsing experience much faster.
Defining "Write Caching"
Combining these two functions forms the write caching operation.
Write caching is a process that places data into a cache in the system's fast, volatile memory (RAM) before it is written to the destination. This process allows the user to perform other tasks while waiting for their data to finish writing with minimal effect on system performance.
This operation is particularly important in boosting the performance of external drives specifically, of USB flash drives. The tiny and innocuous storage device is likely not as fast as your internal drive, thus writing many or large files to it will often take some time.
Thanks to write caching, however, there's no need to tap your fingers and wait. Your computer can store all these write commands in its RAM and serve each one to your flash drive as it becomes ready.
You will see the progress bar reaching 100% in a flash and the dialog box closes rather quickly. However, keep in mind, the task is not completely done. The actual writing is still running in the background but the good thing is, you can perform other tasks while the computer is transferring the cached content to your USB drive.
Although it is extremely beneficial, write caching has its downsides. The major drawbacks are the risk of data loss and data corruption. If you accidentally yank out your USB drive from the computer or in the event of a power loss while writing is still going on, there's a large chance that the data being written will be lost or the file will be corrupted.
The principle of write caching is the same across different operating systems although the implementation can be quite different.
Write Caching in Windows
In Windows, write caching is disabled for USB drives by default, except for those using the NTFS format. The following guide will show you how to enable this feature in Windows 10 to enhance your USB drive's performance.
- Open File Explorer.
- Right-click on "This PC".
- Click "Manage".
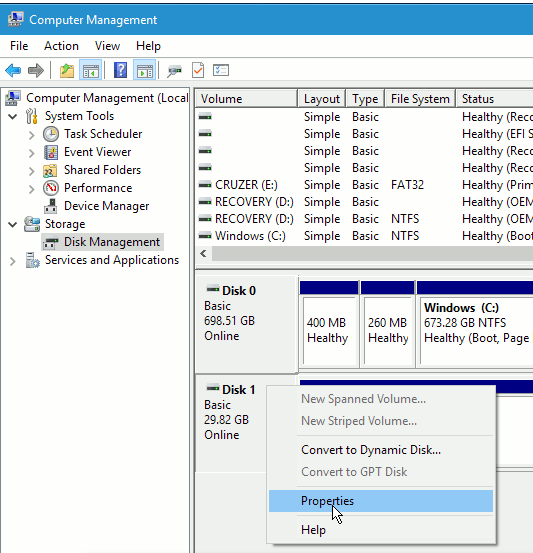
- On the left pane of the Computer Management Window, click Disk Management.
- In the center, look for your USB drive. This is usually Disk 1. If you're still not sure, check the volume of the disks. Note that the actual volume shown will not be exactly the same as your USB drive's capacity, so look for the one that is closest to your USB drive's capacity.
- Right-click on your USB drive and select "Properties".
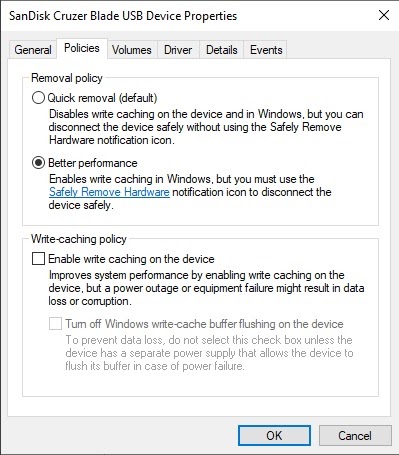
- Click the "Policies" tab.
- Select "Better Performance" and click OK.
- Close the Computer Management Window, you're good to go!
To avoid data loss, make sure to click the little "Safely Remove Hardware" icon in the taskbar before pulling out the USB drive. This would prompt the computer to finish writing the data ensuring all transferred files are complete and intact.
Write Caching in Linux and Mac
Unlike in Windows, write caching is enabled by default in Linux and Mac operating systems.
Since there is a risk of data loss or corruption, some users prefer to disable this feature. This would require running commands in the Terminal. Here are the guides on how to disable write caching in Linux and Mac.
Disabling Write Caching in Mac OS
- Open the Applications folder and click Utilities.
- Double-click "Terminal".
- In the Terminal window, run mount.
- Take note of the USB drive's name.
- In the terminal window, type umount /dev/disk1s1, where disk1s1 is the USB drive's name.
Disabling Write Caching in Linux
- Press CTRL+ALT+T to launch the Terminal.
- Run sudo gedit /etc/hdparm.conf
- Find write_cache and remove the # in front of it.
- Save and restart the computer.
Write caching is a great performance-enhancing feature but it has its own share of pros and cons. To stay on the safe side, always remember to safely eject your USB drive or external storage device before unplugging it.